We already know that backups (and even more so, restores) are of paramount importance.
The hard work we put into our projects must be safeguarded. In the context of teams and organizations this necessity becomes even more pronounced.
Nowadays, features such as codebase backup and version control are assumed as given when we use a git-based cloud provider, such as GitHub or GitLab.
Depending on how critical to the business an application is, you may want to consider further measures in assuring the codebase is backed up with appropriate redundancy.
But what about the database, and, more specifically, the data that it stores?
Once an application goes into production, its generated data has an incommensurable value. Loosing it is a scenario that an organization simply can't afford.
On the occurrence of hardware faults, software faults, or human errors, disaster recovery plans are crucial to ensure that organizations can respond quickly to minimize any negative effects on business operations. In the context of databases, the ability to recover is fundamentally defined by ability to restore.
In this article, we'll describe the implementation of an automated database backup process. It will execute daily, taking a snapshot of a production database, encrypting it, and securely sending it to a remote backup storage server.
Infrastructure and tools
As a general rule of thumb, before implementing a custom solution, one should investigate if the problem has already been solved.
Although many times we may find that it has been solved already, a solution that perfectly fits our requirements does either not exist or the effort to customize it is bigger than just implementing a solution of our own.
This was the case when I was asked to implement this automated database backup procedure. I didn't find anything matching the specificities of our setup, so I had to go with a custom solution.
Let's now examine the following diagram, an overview of the infrastructure and tools involved in the setup:
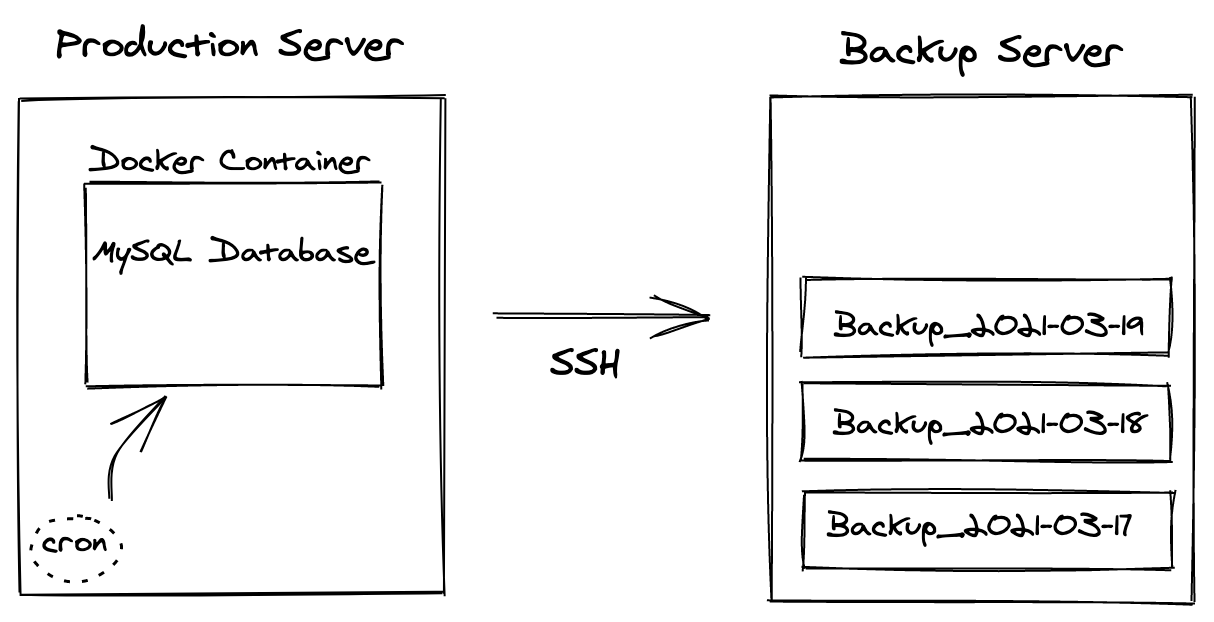
We're working with two Linux servers:
- the production server, where the database is running
- the backup server, where database backups are stored
On the production server, we have a MySQL database running inside a Docker container.
Docker is an awesome containerization tool that helps standardizing development and deployment, by packaging applications and their dependencies.
On the same production server, we also have a cron job, configured to run a shell script that takes a snapshot of the database (including all the data it contains) and sends it to the backup server via SSH.
cron is a time-based job scheduler for Unix-like computer operating systems.
SSH is the de facto standard for secure remote access and data exchange between a client and a server. SSH is a vast subject. Here you can find information on how to configure it properly and manage its keys.
The purpose of this article is not to serve as a step-by-step guide (although you can pretty much use it as such) - but more as a general description of how the procedure was implemented in a real production setting, so that you can adapt it to your specific setup.
Backup script
Before executing any procedure in production, always make sure to test it beforehand in a development/staging environment.
Let's now examine the production server shell script
/root/database-backup/db-backup-production.sh. This file is the core of the
backup procedure. When executed, it will access the Docker container and export
a database snapshot, zip it, encrypt it with GPG, and securely copy the
resulting file to the backup server.
cd /root/database-backup

today=$(date +"%Y-%m-%d")
timestamp=$(date +%s)

printf "Starting backup %s %s\n" $today $timestamp

docker exec container_database_1 mysqldump -u root --password=password123 --events --routines --triggers bd > backup_db_${today}_${timestamp}.sql

zip backup-db_${today}_${timestamp}.zip backup_db_*
gpg -c --batch --passphrase pass123 backup-db_${today}_${timestamp}.zip
mkdir -p backups
scp backup-db_${today}_${timestamp}.zip.gpg backup-repo-host.com:~/database-backups

printf "Backup completed!\n"
printf "\n"
This script is not supposed to be executed directly. Instead, we'll rely on a
secondary script /root/database-backup/run-db-backup-production.sh that will
allow us to have visibility over the history and status of executions, by
appending the execution outputs to a log file every time the procedure runs.
These are the contents of this script:
cd /root/database-backup
sh db-backup-production.sh &>> log.txt
The backup procedure can be executed with two modes of operation:
- manually, on-demand
- automatically, scheduled to run at fixed times, dates, or intervals
Manual backup
To run the backup procedure manually, just execute the script:
sh run-db-backup-production.sh
Look into file /root/database-backup/log.txt for details on the execution
outputs.
Scheduled backups
To have it run regularly, we'll rely on cron.
Let's configure a cron job to run everyday at 10 PM. To do that, execute the
command crontab -e and add the following entry:
0 22 * * * /bin/sh /root/database-backup/run-db-backup-production.sh
Restoring a backup
A backup has no value if we can't restore it.
"Nobody wants backup, everybody wants restore." - The Admin Zen
To restore a backup, follow these steps:
Access backup server
Log in to the backup storage server, navigate to the backup folder and select
the GPG file backup-db_${date}_${timestamp}.zip.gpg of the snapshot you want
to restore.
Copy
Copy it to the server where the database is running, using a secure method such
as scp.
Decrypt
Decrypt the GPG file using the following command gpg --batch --yes --passphrase pass123 backup-db-01-21_1611250508.zip.gpg. The decrypted zip file will be
written to the same folder.
Unzip
Unzip the file that resulted from the previous step, using unzip or any other
archive tool at your disposal.
Restore database
Access the web interface of the database content managing tool you're using (e.g., phpMyAdmin, Adminer) and run the SQL file that resulted from the previous step. Alternatively, if you don't have a content managing tool installed for your database, you can also execute the SQL file through the command-line.
Verify restore
Confirm that the SQL script executed without errors and that the database has been created and populated. Also, make sure to verify that client apps that use the database continue to work as expected.
Conclusion
And, we're done 💪.
Thank you for reading this far!
We've discussed the importance of regular database backups and how to automate them.
As in any process, there's always room for improvement. The next features I'd like to implement:
- Email notifications, specially in the case of failure.
- Secure password management, that would allow removing database and GPG passwords from the main script. This article may be a good starting point.
Feel free to share any comment or suggestion by opening a PR on this article.